At the onset of the pandemic, stand-up paddleboarding exploded in popularity here on Vancouver Island, home to Reliable Controls. Paddleboarding is the perfect combination of physical activity and physical distancing. It's also an ideal analogy to demystify PID loops.
Inflation = P + I ( + D)
"Get an inflatable board," people say. "Pumping is a good warm-up." They aren't lying. If you're lucky, you have a double-action pump, making every upward motion count. At first it's easygoing; only once the volume fills do you start to feel resistance. The closer you get to your desired pressure, the harder you work. You stop when you've had enough or you finally reach your goal. Whoever coined the slogan "show up and blow up" may have been using an electric pump. How convenient, to just set your pressure and flip a switch. Overinflation is a risk, both with an electric pump or if you leave your board in the sun. Some boards have a built-in pressure relief valve, saving you from expensive (and embarrassing) mistakes.
Before we jump in the water, let's describe that process with a PID loop and make the analogy more closely resemble what happens in a building by introducing some air loss.
Let's say your setpoint for inflation is 18 pounds per square inch (PSI), and you inflate the board manually, pumping quickly at first and proportionally slower the closer you get to 18 PSI. But something's wrong—air is escaping. Continual pumping stabilizes the pressure around 16 PSI, but your efforts only ensure you counteract the air loss; you're not getting closer to the desired setpoint. Proportional control alone works this way.
Throw sheer determination (integral control) into the mix, and you get that extra burst of energy that helps you overcome the final 2 PSI. Integral control starts at zero extra effort, but the longer it takes to reach 18 PSI, the more effort you exert. Once you reach the setpoint, you can stop increasing the extra effort.
The pressure relief valve that helps you avoid overinflation is the equivalent of derivative control. It needs both P + I to work. Not all boards have this option, in which case your ability to predict the future and stop on time (i.e., your brain) acts as derivative control. An electric pump works following the same logic: Set it to 16 PSI, and it pumps steadily until it reaches that pressure ( = proportional control). Correct board care dictates that you top up the final few PSI manually until you reach the desired 18 PSI ( = integral control).
Paddling = P + I ( + D)
Vancouver Island has no shortage of stunning locations, from rugged coastline to rivers and lakes. If ever you visit Strathcona Park, be sure to paddle across Buttle Lake toward Lower Myra Falls. The trick is to leave early in the morning; a strong wind picks up each afternoon. Launch from the bridge at the southern tip of the lake, then paddle 2 kilometers (km; about 1 1/4 miles) to the falls. If you want great photos, be sure to paddle with a friend.

Lower Myra Falls, Strathcona Provincial Park, BC.

Buttle Lake, Strathcona Provincial Park, BC.
What are the PID loops at work here? The average person paddles at 3 km/hour ( = your setpoint). The closer you get to Myra Falls, the slower you paddle; the force of the falls plunging into the lake pushes you away. Even a strong paddler with consistent strength (proportional control) will feel the effects of the current. To get up close, you need to exert a bit more effort. Your friend accidentally moves closer than you'd like, so you drift back to widen the gap, then pick up the pace again to resume course (integral control).
If the wind picks up, that’s another force working against you, causing you to drift from your setpoint (whether that's speed or distance), and extra control (integral) is required to keep you on track. Let's say a rogue wave appears, threatening to knock you off balance. Your training (derivative control) enables you to brace (react quickly and correct the deviation) before you land in the water.
Now let's get out of the water and into the field. In the world of building automation, we frequently make use of PID loops—though the systems we control can't respond quickly enough for derivative control to be applied.
How are PID loops used in the HVAC industry?
In the HVAC industry we use PID loops to make alterations to an output based on an input, which is often temperature or pressure. A temperature input can control an actuator output, or a pressure sensor could control a variable frequency drive fan output, for example. Let's talk about a PID loop based on an input from a room-temperature sensor.
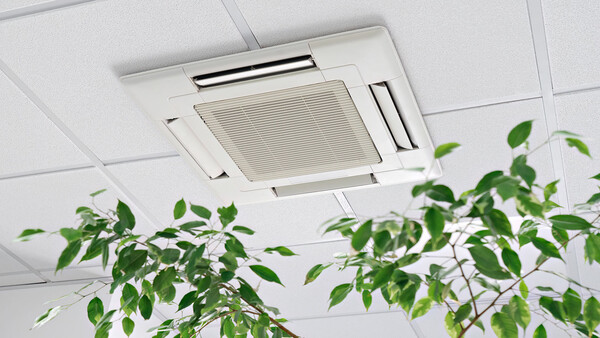
When you heat and cool a space using a terminal unit, the temperature input causes a change in the terminal unit. For this example, imagine a training room is served by a variable air volume (VAV) terminal unit. When the temperature in the space is below setpoint, the VAV provides additional heating. The further away from setpoint the room temperature is, the greater response needed from the heating coil valve actuator. This actuator opens the hot water coil valve, increasing the temperature of the air discharged from the VAV into the training room. The behavior of the room temperature is like the paddler from the beginning of this article. If you paddle too slowly, you will not reach the waterfall. If the actuator responds too slowly, the room temperature will not reach the setpoint. This is where proportional control adjustment comes in.
Proportional control
By tuning your proportional control, you can paddle at a speed that gets you close to the waterfall. Likewise, with correctly tuned proportional control, the actuator can get the training room temperature close to the setpoint. This adjustment is the proportional band, or prop band. The prop band is the maximum distance from the setpoint the room temperature must get before the actuator fully opens the valve.
If the prop band is too small, the actuator fully opens the valve on a small deviation of temperature. This results in the temperature overshooting the setpoint. When the temperature is at or below setpoint, the valve is closed. Similarly for your paddleboard journey, too small a prop band would cause you to exert too much power and move too quickly toward the waterfall, stop paddling too late, and end up being pummeled by the waterfall. You would quickly be pushed farther away from the desired location and need to start again. The same would happen with a valve and temperature: The valve would open too much, increasing the temperature above setpoint, and—even though the valve would shut when the temperature reaches setpoint—the temperature in the room would continue to increase due to the current water temperature in the VAV heating coil. When the temperature drops below the setpoint, the cycle begins again. This rapid opening and closing of the valve is short cycling (also known as hunting). It is characterized by the sound of the actuator driving rapidly open and then closed. It dramatically shortens the life of the actuator.
If the prop band is too large, a big temperature difference is needed between the setpoint and room temperature for the heating coil valve to fully open. This would result in the room temperature not reaching the setpoint. Similarly, you also wouldn't get close to the waterfall on your paddleboard.
A correctly set prop band would enable the room temperature to get close to setpoint but not actually reach it. This is what you’re aiming for. When the setpoint is reached, the valve shuts. You want the heating coil valve to remain open enough to maintain a temperature that is close to setpoint but not actually setpoint. You want to be close to the waterfall but not directly under it. Right now, you’re close to setpoint, but you would like to be closer. Proportional control alone can’t get you closer, but another option can: integral control.
Integral control
Integral control opens the heating coil valve based on the time the room temperature has differed from setpoint. This difference is the offset, and the value is an accumulated value. The integral setting is the amount of time it takes to add all this accumulated value to the offset to bring the room temperature to setpoint. Applying integral control to your paddle, you know the distance to the waterfall and how long it will take to get there. You paddle at the rate that would get you to the waterfall in the time allowed.
Why combine proportional and integral control? Use proportional control to make rapid changes: Opening the heating coil valve fully allows for a quick change in temperature. Use integral control for slower, more subtle changes. If the integral value is set too high, it can cause short cycling. If it is set too low, the room temperature takes a long time to reach the setpoint.
Derivative control
In PID loops, the D stands for derivative. However, it’s better not used for HVAC. In this case, the heated air takes too long to react to changes to make derivative control useful. But there is another D that is useful: dead band.
The Reliable Controls system allows you to set a dead band value. This is a range above and below setpoint. In this band, the proportional and integral are considered to be at setpoint. Why is this useful? When the proportional or the integral are not at setpoint, the actuator operating the heating coil valve makes micro-adjustments in an attempt to get the room temperature to setpoint. These small adjustments cause wear to the actuator. Setting a dead band stops the micro-adjustments and prolongs the life of the actuator.
i
How do you put this into practice?
1. Set up a trend log to monitor the PID loop.
2. Set the logging interval to a very rapid rate—as fast as 1 second, for example.
3. Tune the proportional control first. Set the prop band to a large value. The trend log should show a room temperature value that is not getting close to the setpoint (Figure 1).
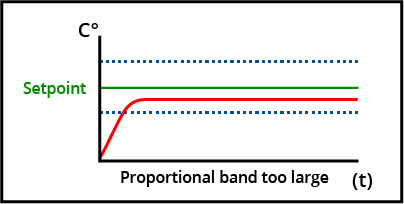
Figure 1: Prop band set too large.
4. Next, enter a small value for the prop band (Figure 2). The trend log should show the valve being rapidly opened and closed, and the room temperature changing from higher than setpoint to lower than setpoint. This is short cycling. Neither of these values are what you want for your PID loop; they are guides.
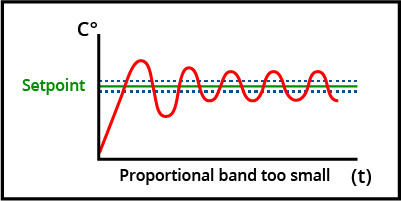
Figure 2: Prop band set too small.
5. You can now enter a value for the prop band that is about halfway between the two values you just tried. If you review your trend log and see that this valve is short cycling, you know this prop band value is still too small. Choose a value halfway between the large prop band value and this recent value. Your aim is to keep reducing the gap between a prop band that results in short cycling and one that never gets close to setpoint. Instead of just testing random values, start with two values you know won’t work and gradually hone in on the optimum prop band (Figure 3).
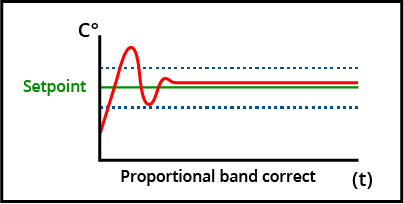
Figure 3: Prop band set at an ideal value.
To tune the integral control, follow a similar method. Integral takes longer to show changes, so you can set a high value, maybe 20 times per hour, and leave it for a while. It can take a few hours to properly tune the integral; you may want to start tuning the loops before your other tasks at the job site. Slow changes to the room temperature are good for occupant comfort, but an integral that takes more than an hour to get 1°C closer to setpoint is too slow.
Just like paddleboarding, fine-tuning loops is a skill that takes practice. The first loop you tune will be harder than the second. Every time you tune a loop, you will get a little better at it, and you will develop a better feeling for the values that should be used for testing the prop band and the integral. A well-tuned loop is a thing of beauty, and your customers will thank you for the improvements in comfort and the reduction in issues caused by worn equipment. Happy tuning!